Making Your Own Essential Oil Soap
Apr 21st 2021
Posted by Stephanie Chambers
by Stephanie Chambers

There are two main ways to make your own essential oil soap. You can make the soap from scratch and add the essential oils towards the end of the process or, an easier way is to buy some unscented natural soaps and melt them and add some essential oils before they re-harden.
MAKING SOAP USING THE COLD PROCESS
There are many websites which describe how to make soap from scratch. This is sometimes called the “cold process”. But the key ingredient in doing so is “lye” (100% sodium hydroxide). This can’t be substituted. Be very careful because lye is caustic. You don’t want to burn your skin with it, so make sure you use gloves, wear eye protection and also a mask so that you don’t choke on the fumes which are emitted when you mix it with water.
Always add lye to water - not water to lye. You have to start stirring immediately because if you let clumps settle on the bottom, they can cause explosions. The lye doesn’t remain in the actual soap you create because it reacts with the saponifier oils you use in making it. That’s why the process is called saponification. Make sure you consult a lye chart to make sure you are using the proper ingredient ratios. Most of the websites that sell the ingredients for making soap have these charts. Because the amounts are critical, don’t just rely on measuring cups. Use a scale as well (weigh the empty glass before you add the liquids, then weigh it with the liquids in it and subtract the weight of the glass to get the weight of the liquids themselves).
In terms of the saponification oils you use, you have a wide variety to choose from. For example, Apricot Kernel Oil (which is great for aging and dry skin), Argan Oil, Avocado Oil (great for dry or sensitive skin), Canola Oil (make sure it is organic as others may be genetically modified), Castor Oil (although its smell may override that of your essential oils), Chia Seed Oil, Coconut Oil, Grapeseed Oil, Hazelnut Oil (great for oily skin and acne), Hempseed Oil, Golden Jojoba Oil (also great for all skin types and acne), Olive Oil (great for sensitive skin), Liquid Shea Oil, Sweet Almond Oil, Rice Bran Oil (good for mature, normal and sensitive skin).
You don’t have to use all of one type of saponification oil. You can mix the oils (e.g. 30% Avocado Oil, 30% Coconut Oil, 30% Olive Oil and 10% Sweet Almond Oil).
Soap made using this method needs to stay in the mold for 24-48 hours. After you remove it from the mold, you have to let it cure for 4-6 weeks.
MAKING SOAP USING THE MELT AND POUR METHOD
If you are afraid to use lye, a less dangerous way to make your own essential oil soap is the “melt and pour method”. You melt the base soaps, cool them a little before adding the essential oils and then pour the soap into molds. You can spray with alcohol to remove any bubbles on the surface.
You just have to wait for it to harden before you can use it. But no long curing time is required.
There are websites where you can buy the basic supplies to do this. Note that the base soaps used to do this have additives to make them easy to re-melt. The downside of this is that they don’t last as long in the shower as soaps made from scratch using the cold process.
HOW MANY GRAMS OF ESSENTIAL OILS SHOULD YOU ADD TO YOUR SOAP?
It is a matter of taste, but you can add between 3% - 5% per pound of saponification oils for the cold process or base soap in the case of the melt and pour method. For example, for every 1000 gms of saponification oil used in a recipe, you can use between 30 - 50 gms of essential oils (around 2 to 3 tablespoons but you should weigh it like you weigh the rest of the ingredients especially if you are using the cold process).
Of course, some essential oils have a stronger odor than others. For example, you will need less Patchouli than you would Lavender. Sometimes the fragrance can disappear when the soaps are left out to cure, especially if it is a top note essential oil likePink Grapefruit. If you find this a problem, you can reduce this by adding a base note essential oil as a fixative. Some examples of base notes are Ylang Ylang (this combines well with Patchouli) and Benzoin Resinoid (this blends well withLemon). Some essential oils that are also good for soaps are Elemi (this combines well with Lavender), Orange (this blends well with Rose Geranium, Lavender and Ylang Ylang), Rose Geranium (this blends well with citrus oils and with Ylang Ylang) and Rosemary (this blends well with Orange).
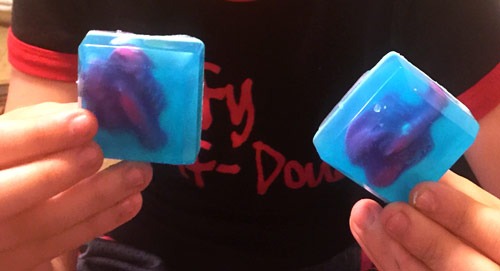
Jody Pardo decided to use some Amrita Aromatherapy essential oils in the soaps she was making to promote her new book "Forever: A Lobster Kind of Love". She made her soaps so they had little lobsters in them. Jody used the melt and pour method. She used an opaque soap which she colored red to be the lobster in the middle. She used either shea butter soap or goat’s milk soap as the opaque soap. She surrounded this with a clear glycerin soap colored blue like the sea. All the soaps were organic. Jody used Sweet Orange Essential Oil, Peppermint Essential Oil and Patchouli Essential Oil (not mixed - one scent per soap batch).
Jody said, “I am an author and a mother. For book signings, we the authors give away products and trinkets etc to our fans that come out to see us and buy books. I am typically practical in nature and found a lot of the things given away were useless and probably would be discarded. So, I create "swag" giveaways that are practical that not only are useful but will keep my book, product, tagline in people's minds. So my giveaways consist of notepads, tissues (allergy season), wet wipes, refrigerator magnets, chapstick and SOAP.” Jody was very happy with how her soap’s turned out. Not only did they look fantastic, but they smelled great too.
Making soap can be a fun thing to do. What type of soaps would you like to make? Or if you have already made some, please use the comments section below to share your experiences. We’d love to hear of your creations!
Disclaimer: The statements made in this blog have not been evaluated by the U.S. Food and Drug Administration (FDA). They are not intended to diagnose, cure or prevent any disease. If a condition persists, please contact your physician or healthcare provider. The information provided is not a substitute for a face-to-face consultation with a healthcare provider, and should not be construed as medical advice.
Original Published: 2016-07-02 / Last Modified: 2021-10-11

